Saturday 30 September 2017

Deck the Halls for GDP #106

Hello everyone. I'm sure I'm not the only paper crafter who loves Christmas and like many of you every year I can't wait to make a start on my Christmas creations. However this year, life has been so busy I've not done a scrap of Christmas crafting.... until today!!! 
So here it is, my very first Christmas card for 2017.


The inspiration for this card came from the Global Design Project sketch challenge this week, GDP #106. I love a great sketch challenge and this one is no exception. 


Once I had completed my card I still had my crafting mojo and the kids were entertained so I decided to create a coordinating wine bottle gift tag.  


I always make sure to have a couple of bottles of wine on hand around Christmas and these wine bottle gift tags are the perfect instant gift wrapping.

Both of these projects will be featured at a Christmas Paper Craft Party I'm co-hosting with the super amazing Jennifer Frost and Tracy Bish next month. I'd love to see you there, to find out more or book you place head over to booking page on Jennifer Frost's blog (click here)

Thanks for stopping by. Make sure you pop over the the Global Design Project to see how others have been inspired by this sketch

- Tan xx

Tuesday 26 September 2017

Wild about fussy cutting

Hands up if you enjoy fussy cutting. I know fussy cutting is not every crafter's cup of tea but for me there's something almost therapeutic  about it. The process of carefully cutting around detailed images leaves me feeling quite calm and focused, so you can imagine how I was feeling after fussy cutting all these images from the Pick a Pattern Designer Series Paper from Stampin' Up! 


The inspiration for this card came from this week's TGIF technique  challenge (#tgifc126) , to create a "z" fold card. For a little while now, I've had an idea to use these cute little images to create a camping themed landscape, so when I saw this challenge I decided it was the perfect opportunity to turn an idea into reality. 


There are several different styles of "z" fold cards and for this project I decided to go with a "double z" card to add a little dimension and so I could extend the camping scene.


Thanks for stopping by. If you want to see some other amazing "z" fold cards be sure to pop over to the TGIF Challenge page, you are going to love what the designers have come up with.


- Tan xx

Friday 22 September 2017

Tone on tone stamping for GDP#105


This week's Global Design Project (GDP #105) challenge is a colour challenge and I have to admit I find colour challenges the trickiest. However, when I saw this weeks colour combo of Peekaboo Peach, Tangerine Tango and Lemon Lime Twist, I was excited to see where I could go with it and this is the card I came up with. 


I possibly cheated a smidge by incorporating a bit of copper and some woodgrain Designer Series Paper in the design but don't you just love the contrast?

Its no secret that I love the Oh So Eclectic stamp set and Eclectic Layer thinlits, the flowers and leaves really lend themselves to tone on tone stamping which is why the flowers look great with a Peakaboo Peach background and Tangerine Tango details. To achieve the same tone on tone effect with the leaves I inked up the watercolour leaf stamp with Lemon Lime Twist and then stamped it first on a scrap of paper before stamping the image on Whisper White card so get a lighter image then I've stamped the detail in full strength Lemon Lime Twist.


Do you notice the embossed detail behind the flowers? Stampin' Up! have included some emboss only dies in the Eclectic Layers thinlits. These thinlits are a great way to add little embossed detail to your projects without embossing a whole panel.

Thanks for stopping by. If you want to see some other amazing projects featuring this colour combo be sure to pop over to the Global Design Project page, you are going to love what the GDP designers have come up with.

- Tan xx

Thursday 21 September 2017

Let's Get Hopping | Thrifty Crafting Tips


Today's post is a bit of a milestone post for me, my very first blog hop!

I've always been a huge fan of blog hops so when fellow Stampin' Up demonstrator (& my SU mentor) Jennifer Frost asked me to be part of the Let's Get Hopping blog hop, of course I jumped at the opportunity.

If you are not familiar with a blog hop, at the end of each participant's post you will find a "Next" button that will take you on to the next blog until you end up back here.

The theme for our first hop is "What is your favourite thrifty crafting tip?" and our task was to create a project using this tip. When I found out the theme I knew instantly knew exactly what my favourite thrifty tip was and this is the project I came up with. Can you pick what my tip is?


I love using layers of cardstock on my cards but when you can only see a small amount around the outside of the card it seems such a waste. But with this project I wanted to include a circle in the same Berry Burst cardstock as the second layer. So when I diecut the circle with the Stiched Shape Framelits I cut it out of the middle of the Berry Burst layer. Then I've layered the Whisper White cardstock over the top of the Berry Burst to hide the hole. Here's a picture of the Berry Burst layer before I've adhered the cardstock to the Whisper White cardbase.


However, while I was creating this project I became aware of other thrifty tips that I've been using in my crafting so I thought I'd also share a picture of the underside of the cake to show how get the most out of some other Stampin' Up! supplies.


Firstly, you'll notice that I've only used half a silver Metallic Foil Doily, the other half would have been completely hidden by the cake so I've cut a full doily so I can use the other half on another project.
Secondly, when using Stampin' Dimensionals I will often cut them in half, which stretches a packet just that little bit further.

Thanks for stopping by. I hope I've given you some inspiration for being thrifty while crafting. Next up is the amazing Cathy Caines I can't wait to see what thrifty tips Cathy has to share 

- Tanya xx

Sunday 10 September 2017

Trying something new

Welcome back,

Today's project features a new technique that I'm so glad I've finally attempted. 
When I discovered Embossing Paste in the 2017-2018 Stampin' Up! Annual Catalogue I was so excited and immediately grabbed a pot along with some palette knives and the Pattern Party Decorative Masks. However, with an enquisitive two year old in the house, I've been reluctant to try it out, fearing it could get a bit messy (I was envisioning little fingerprints of paste trailing from my project. 😉)
Finally last night, once my little people were tucked up in bed, I pulled out my tub of paste, masks and palette knives last night  and I very quickly realised that I had nothing to fear.... the paste is sooo super easy to use and the paste dries very quickly so no need to be concerned of little fingerprints finding their way onto my projects. 
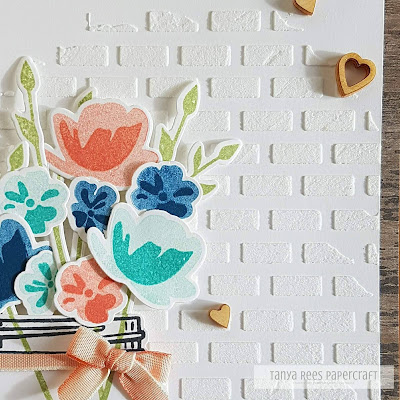
I decided to leave the paste white for this project and the brick pattern mask was a perfect backdrop for a mason jar of flowers from Jar of Love. 


You can see from the close up photo below that the embossing paste creates a textured pattern on cardstock. I love the way it lifts a plain white background without add colour.


I'm looking forward to having some more fun with embossing paste today , this time using some re-inkers to colour it. Can't wait to share what I cone up with.

Thanks for stopping by
- Tan xx

Friday 1 September 2017

Sweet treat packaging

Hi again,

I've been a bit absent from here over the past couple of weeks. Life outside of papercrafting has been a little hectic of late and sadly my blog has had to take a step aside for a few days. But now I'm back and excited to share some more gorgeous projects with you.

While most of my papercrafting time is spent cardmaking, one of my favourite things to create is beautiful packaging for treats and gifts. I'm very lucky to have an amazing homemade macaron business called Flavour + Heart in my local area and aside from being absolutely delicious, their macarons are so pretty and I just couldn't resist having a play with some beautiful gift packaging to compliment them. 


These Clear Tiny Treat boxes from Stampin' Up! are the perfect size to hold 2 delicious macarons. Add a belly band of Delightfully Daisy DSP, a paper daisy from the Daisy Delight stamp set and a little ribbon and mini sequin trim and you have a beautiful treat to give as a party favour or wedding bonbonarie.


The next treat box has been made with some soft sky cardstock and a panel of window sheet scored and wrapped around the box so it will slide on and off. I've then added a belly band of Naturally Eclectic DSP and embellished it with a die cut diamond (from the Eclectic Layers thinlits) in silver glimmer paper, coordinating cardstock and a little silver mini sequin trim. For the 
sentiment I went with a Thank You from the All Things Thanks stamp set.


While a couple of macarons are nice as a small thank you gift or party favour, a box of 12 macarons was the perfect birthday gift for my macaron loving sister. 
The inspiration for this packaging came from this gorgeous card by the amazing Susan Wong


Usually when I CASE a project I take one or two elements and come up with my own creation but in this case I really struggled to improve on, what I'm sure you'll agree, is perfection. Thanks for the inspiration, Susan

Lastly I wanted a fun way to package a single macaron for a kids birthday party and I came up with this macaron pop in a box.


Flavour + Heart's legendary Fruit Tingle macarons looks amazing in this window sheet box embellished with a simple banner, an embossed balloon and a little white bakers twine.

Thanks for stopping by. I hope you've enjoyed my projects and I haven't left you craving macarons too much (I'm kinda wishing I had a mac or two to have with my afternoon cuppa)

- Tanya xx